RESUME > Search Resume
Search Resume page allows you to search for existing resumes in Resource Management System.
Quick Search : Use less filter options.
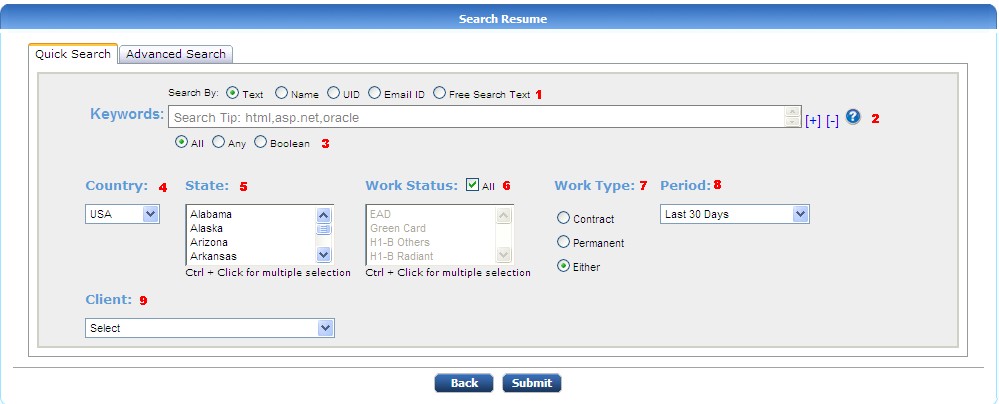
For searching the existing resumes, You may use the following filters.
- Search by what? (It will search in selected area with the keyword provided in below textbox)
- Search tips button : Click on this button for getting help notes on 'how to use keywords section' for search.
- These are search options :
- ALL – return all the resumes which have all of the keywords mentioned
- ANY – return all the resumes which have any of the keywords mentioned
- BOOLEAN - return all the resumes which have the exact keyword mentioned
- Select Country for the Resume
- Select state for the resume
- Select Work status of the candidate (like Green Card, H1B etc.) from given drop down list.
- Select Work type of the candidate (If ‘either’ is selected Contract and permanent candidates will come in result )
- select the Period in which the resumes are added. For example if you select last 30 days, The resumes which are added in last
30 days only will be shown.
- If you want to filter out the resumes with client, Use this drop-down list to select a client.
Advanced Search : More filter options.
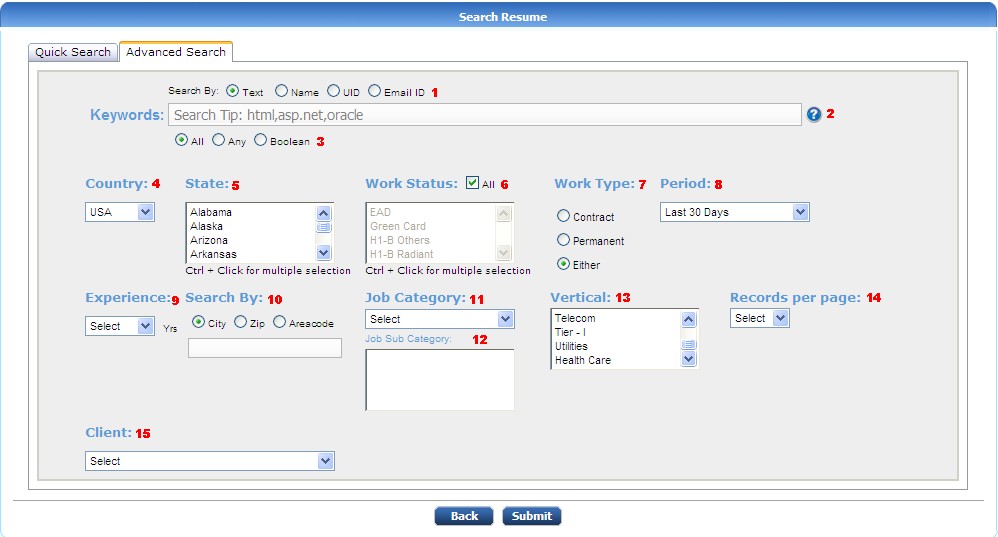
- Points (1) to (8) are same as quick search.
- Use this drop down list to filter by Experience of the candidate.
- select city/zip/area code then enter the search value in the below text box)
- specify the category of the job with the help of this drop down list.
- After selecting the Category, select Sub category from the given drop down list.
- You can select Vertical categories from the list. multiple items can be selected by pressing 'Ctrl' button.
- You can customize the result view. Select any value from the given drop-down, that many records (if available) will be displayed per page.
- Name of the client. ( refer point (9) in quick search ).
After entering search criteria click on 'Submit' button to search resume according to your search conditions.
You will get the result as shown in below Screen Shot.
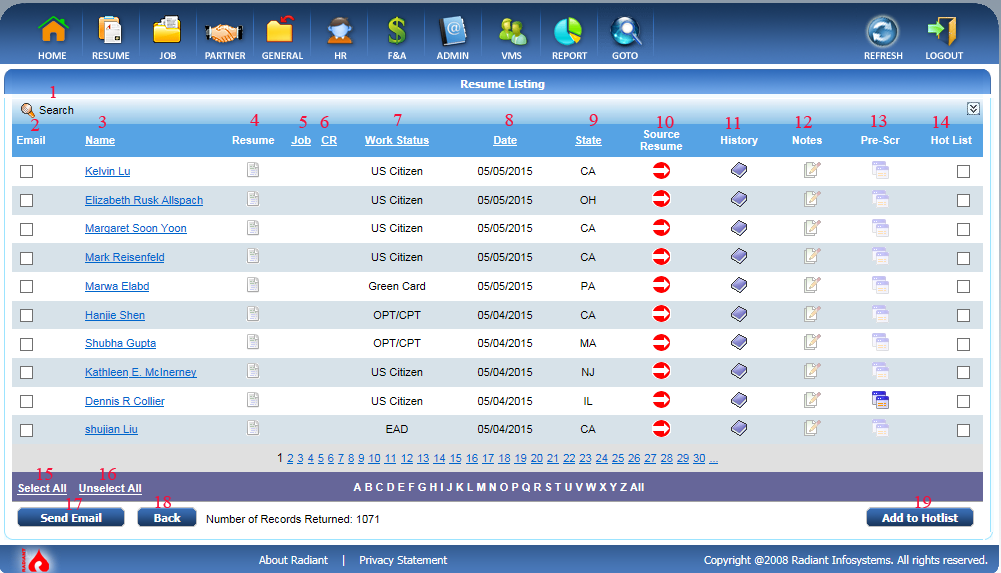
- Click to get again search options to search resume.
- Check the checkbox and click on 'Send Email' button to send the mail.
- Name of the candidate got according to search criteria.
- Click on respective resume pop up will appears as shown in below screen shot.
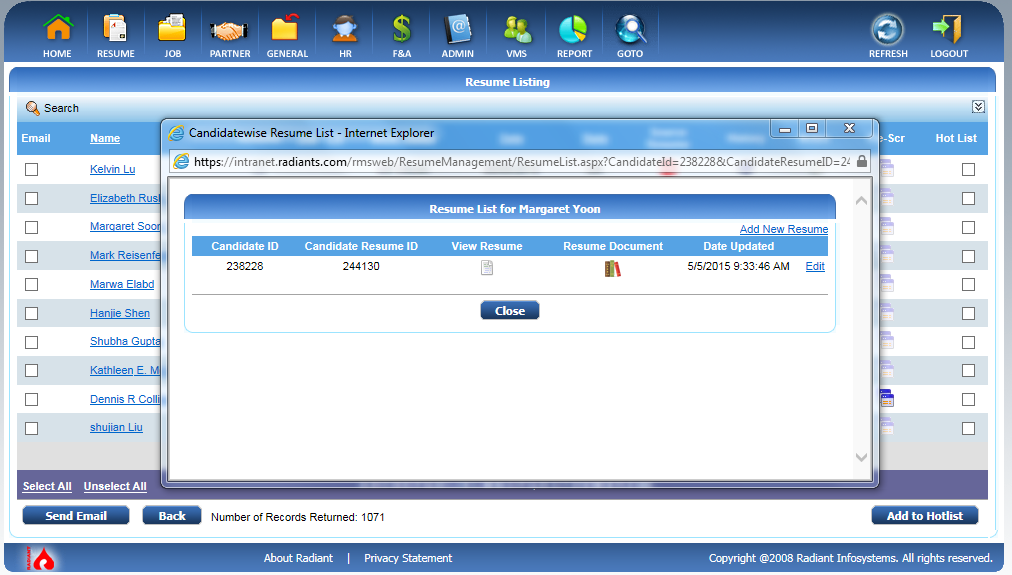
The popup consists of Candidate ID(Unique ID given to the candidate), Candidate Resume ID(Latest Resume ID will be displayed),
Click on View resume to view the resume which is uploaded latest.
You can also view the documents for that candidate if any and also displays the last updated date and time in RMS.
Allows you to add new resume by clicking on 'Add new resume' link and also allows you to edit the existing one by clicking on 'Edit' link.
You can see Edit Resume as sub module of 'Search Resume'.
- Displays the work status of a Candidate.
- Displays the date in which the resume is sourced.
- Displays the state of candidate in which candidate belongs to.
- Click on 'Source Resume' to source the updated resume.
- Click on 'History' to see full detailed history of the candidate as shown in below screenshot.

You can see the Client Name, Client Reference ID, Intranet Job reference, Employment basis,Click on View Resume to view candidate resume,
Resume submitted date, BillRate per hour, Pay rate, Submitted by recruiter name, Account manager name and status of the resume like submitted
or pending etc..
- Displays notes if any.
- When you click on prescreen the below popup will appears.

Details of prescreen with Date of pre screened , prescreeened by , for which Job ID, for which client name,With client reference, Click on pre screen
to view pre Screen of candidate and Click on Get Authorization to authorize.
- Check the Hot List checkbox and click on Hot List button to hot list the candidate.
- Click on Select All link to select all candidate for sending mail.
- Click on UnSelect All link to unselect all selected candidate.
- Click on Send Email button to send mail for all selected candidate.
- Click on Back button to go back for Searching page.
- Click on Add to Hotlist button to add all selected candidates to hot list.
When mouseover on candidate name popup will appears as shown in below screen shot :
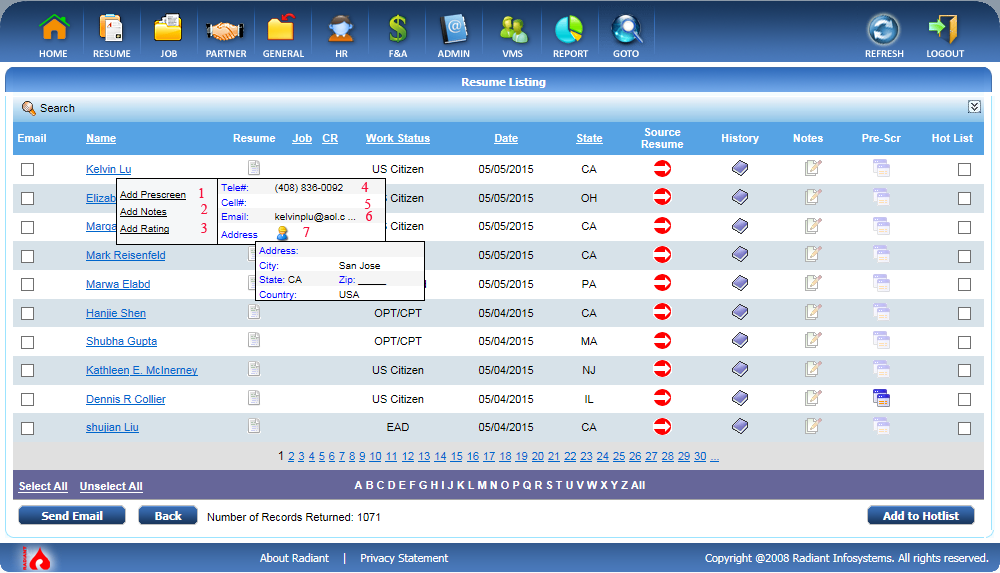
- Click on Add Prescreen link to add the candidate for prescreen.
- Click to Add Notes, if any notes for the candidate as shown in below screen shot.

Allows you to add new notes for candidate and also displays if any notes exists in note history, Click on Close button to close popup.
- Click on Add Rating link to add rating for respective candidate as shown in below screen shot.

Allows you to add new rating for the for the candidate with the reason, Click Save button to save rating.
If any Existing rating will display as Rating History and click on Close button to close the popup.
- Displays the Telephone number of the candidate if any.
- Displays the Cell number if any.
- Displays the Email of the candidate.
- when mouse over on address, it displays the full address of the candidate.
© 2014  Radiant Systems India Pvt. Ltd. All Rights Reserved.


